
Can your cooking result in meals that are both good and good for you? Yes! That's my goal every time I head into the kitchen. And I'm not the only one with that aim. Indeed, the notion that nourishing food isn't tasty is destined for the compost bin of outmoded culinary ideas.
This is true even when it comes to desserts. For just a lick of proof, check out these recipes from recently published cookbooks for a modern take on sweet finishes.
 Cooking With Scraps:
Turn Your Peels, Cores, Rinds and Stems Into Delicious Meals
85 scrumptious recipes for
zero-waste cooking
By Lindsay-Jean Hard
Published by Workman Publishing
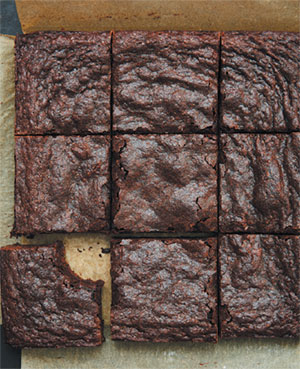 Fudgy Aquafaba Brownies
These brownies are in part modeled after esteemed pastry chef and author Alice Medrich's Best Cocoa Brownies, which I love for their convenience as well as for their fudgy texture. I find that I get almost exactly 1/2 cup aquafaba* from one can of beans, and I like to use the liquid from black beans for this recipe, though any kind will do. You can find espresso powder online.
1/2 cup aquafaba
1 cup all-purpose flour
3/4 cup natural unsweetened cocoa powder
1/4 teaspoon fine-grain sea salt
1/4 teaspoon baking powder
1/2 teaspoon espresso powder (optional, but encouraged)
1-1/4 cup granulated sugar
1/2 cup unsalted butter, melted and cooled slightly
1 teaspoon vanilla extract
1. Preheat the oven to 350°F.
2. Line an 8-inch-square baking dish with a parchment sling - two pieces of parchment paper going in opposite directions with an overhang over the edges of the pan - so you can easily lift the brownies out. Alternatively, line the bottom and sides with aluminum foil.
3. Place the aquafaba in the bowl of a stand mixer and whip, using the whisk attachment on medium speed, until the aquafaba gets foamy, and then on medium-high until it gets thick and very foamy, and soft peaks form - 10 to 20 minutes. Once you get soft peaks, stop whipping; just as with egg whites, it is possible to overwhip aquafaba and have it deflate.
4. Meanwhile, whisk together the flour, cocoa powder, salt, baking powder, espresso powder (if using) and sugar in a medium-size bowl.
5. Gradually add about half of the combined dry ingredients to the aquafaba, stirring each time to gently combine. Mix in the butter and vanilla extract. Then gradually add the remaining dry ingredients and stir until just combined - it will be a thick batter.
6. Evenly spread the batter in the prepared dish and bake until the brownies look set and the edges are just starting to pull away from the sides of the dish, 30 to 35 minutes.
7. Let cool in the dish, then remove and cut into 16 or 25 squares. Any leftover brownies can be stored at room temperature in an airtight container.
*Aquafaba is the name for the cooking liquid from beans and other legumes, and it behaves remarkably like egg whites. Aquafaba will whip up into fluffy peaks, whether it comes from canned beans or from soaking and cooking dried beans, but if you're new to the ingredient, I'd start with aquafaba from canned beans.
Makes 16 large or 25 small brownies
Excerpted from "Cooking From Scraps" © 2018 by Lindsay-Jean Hard. Reproduced by permission of Workman. All rights reserved. Photos: Penny De Los Santos; Headshot: Kate Bek Photography.
 Latin Comfort Foods Made Healthy: More Than 100 Diabetes-Friendly Latin Favorites
By Ingrid Hoffmann
Published by American Diabetes Association
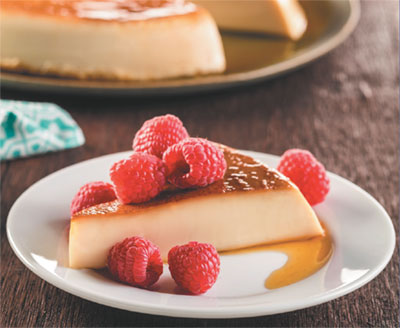 Cinnamon Flan
You might be asking yourself, "How can it be possible to have a flan in a diabetes-friendly cookbook?" I have to tell you that this happens to be one of my favorite desserts in this book. The magic trick was not using condensed milk and using fat-free evaporated milk instead. Of course, a flan is not a flan without caramel. And for caramel you need real sugar. I used just enough caramel to make this dessert delicious but still guilt-free.
1/3 cup sugar
1/4 cup water
2 cups fat-free milk
One (12-oz) can fat-free evaporated milk
3 tablespoons granulated sugar substitute baking blend (such as Truvia Baking Blend)
1/4 teaspoon cinnamon powder
Two (3-inch) cinnamon sticks, broken in half
2 teaspoons vanilla extract
5 large eggs
2- 2/3 cups raspberries
1. Preheat the oven to 350°F.
2. Combine the sugar and water in a small, heavy-bottomed saucepan. Bring to a boil over medium-high heat and cook, swirling the pan occasionally, until the caramel is lightly browned, about 12 minutes. Immediately pour the caramel into a 2-quart round baking dish, tilting the dish to evenly coat. Set aside until the caramel is cool and hardened, about 10 minutes.
3. Meanwhile, combine the milk, evaporated milk, sugar substitute, cinnamon powder and cinnamon sticks in a medium saucepan. Bring to a simmer over medium-low heat and cook, stirring occasionally, for 6 minutes. Remove from the heat. Stir in the vanilla and let stand 15 minutes. Remove the cinnamon sticks.
4. Beat the eggs in a medium bowl. Slowly whisk into the milk mixture until well blended. Pour into the baking dish.
5. Place the baking dish with the flan mixture into a 9x13-inch roasting pan and fill the roasting pan with enough hot water to come one-third of the way up the sides of the baking dish. Bake until the custard is set but jiggles slightly in the center, 50–55 minutes.
6. Transfer the pan to a rack; let cool 1 hour. Refrigerate until well chilled, about 3 hours or overnight. To unmold, run the tip of a small knife around the edge of the flan. Place a large, flat plate on top of the flan and flip it over. Cut the flan into wedges and serve each wedge with cup raspberries.
Serves 8
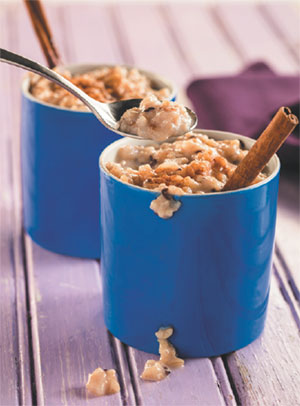 Arroz Con Leche
(Rice Custard)
If you are Latin, then you have most certainly had this delicious dessert; I believe all of our countries make it. What you probably have not had is a guiltless version that you will love just as much as the traditional dish. So here is my gift to you. Go ahead, enjoy and celebrate!
1 cup uncooked instant brown rice
2 cups fat-free milk
1 cup water
2 tablespoons granulated zero-calorie sweetener (such as stevia)
One (3-inch) strip orange peel
One (3-inch) cinnamon stick
1 tablespoon flaxseeds
3 whole cloves
1 teaspoon vanilla extract
1/2 teaspoon ground cinnamon
1. Prepare the rice according to package directions.
2. Combine the cooked rice, milk, water, sugar substitute, orange peel, cinnamon stick, flaxseeds and cloves in a medium saucepan; bring to a boil. Reduce the heat to medium low and simmer, stirring often, until the rice pudding is thick and creamy, about 20 minutes.
3. Remove from the heat. Remove and discard the orange peel, cinnamon stick and cloves. Stir in the vanilla and ground cinnamon.
Note: Instant rice, also known as minute rice, has been precooked and dehydrated so that it cooks more rapidly. I do not use it often, as it is more expensive and has less nutritional value than regular rice. But the brown instant rice is a great option for a recipe such as this one, where we need the rice to cook fast and want to end up with a creamy texture.
Serves 4
 Unicorn Food: Beautiful Plant-Based Recipes to Nurture Your Inner Magical Beast
By Kat Odell
Published by Workman Publishing
 Raw-Cacao–Banana "Ice Cream" With Almond-Macadamia Crumble
This banana ice cream is a dream. You can essentially make it from one ingredient alone, and because of banana's pectin content, when you break down the frozen fruit and then whip it, you get a silky smooth and creamy texture. You can add whatever other ingredients you like, such as almond butter or other types of fruit.
While I often top the ice cream with honey and crunchy-sweet Almond-Macadamia Crumble (recipe follows), for a more playful presentation, I scoop it into a gluten-free cone and dust it liberally with natural rainbow sprinkles.
4 bananas, peeled, frozen and cut into 1/2-inch rounds
3 tablespoons raw cacao powder
Pinch of fine sea salt
2 tablespoons raw honey
Almond-Macadamia Crumble, for serving (recipe follows)
1. Place the frozen banana rounds in a food processor or high-powered blender and process, scraping down the side of the bowl as needed, until the banana has broken down into a creamy, thick and shiny cream, about 3 minutes. Add the cacao powder and salt, and process to blend.
2. Scoop the "ice cream" into four individual bowls and top each with 1-1/2 teaspoons of the honey and a generous sprinkling of Almond-Macadamia Crumble. Serve immediately.
Serves 4
Almond-Macadamia Crumble
1 cup macadamia nuts
3/4 cup moist almond pulp ((left over from making almond milk)
1/2 cup coconut butter
1/4 cup coconut palm sugar
3 tablespoons mesquite powder
2 tablespoons hemp seeds
1 tablespoon flax meal
1 tablespoon ground cinnamon
1 tablespoon cacao nibs
2 teaspoons pure vanilla extract
1/4 teaspoon fine sea salt
Combine all the ingredients in a food processor and blend until the macadamia nuts are broken down into a coarse meal, about 30 seconds.
Note: Almond-Macadamia Crumble will keep, in an airtight container in the freezer, for about 3 months. Bring to room temperature before using.
Makes 2-2/3 cups
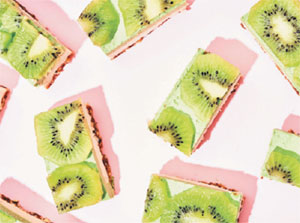 Kiwi–Passion Fruit Vegan Cheesecake Bars
Although these pretty green bars are devoid of dairy, you'd have no problem convincing someone otherwise! Using cashews and coconut oil for their creamy base, these delicious chilly sweets are reminiscent of the Italian dessert semifreddo, which is made from frozen cream. To balance out their richness, I've added lime juice and fresh passion fruit for a hit of acidity.
For the base:
10 pitted dates
6 medium to large dried figs
cup raw organic almonds
1 tablespoon coconut oil, melted
2 tablespoons unsweetened coconut flakes
For the filling:
3 cups raw/organic cashews, soaked in water to cover overnight, drained
3/4 cup coconut oil, melted
1/4 cup fresh lime juice
2 passion fruits, halved and pulp scooped out (discard the shells)
2 tablespoons filtered water
1/2 cup yacon syrup (sweetening agent extracted from the yacón plant), raw honey or pure maple syrup
1 vanilla bean, split in half lengthwise and seeds scraped out
1/4 teaspoon fine sea salt
1/4 cup packed fresh baby spinach leaves
4 kiwis, peeled
1/4 teaspoon spirulina powder
1. Line a 10x7-inch baking pan with parchment paper, extending the paper up and over the sides.
2. Make the base: Combine the dates, figs, almonds, coconut oil and coconut flakes in a food processor and blend until the mixture is broken down and sticks together, about 1 minute. Transfer the mixture to the prepared pan and, using the back of a spoon, press the mixture firmly into the bottom of the pan.
3. Make the filling: Combine the cashews, coconut oil, lime juice, passion fruit pulp, filtered water, yacon syrup, vanilla seeds and salt in a blender and process until the mixture is thick and smooth, scraping down the sides as needed, about 30 seconds. Spoon half of the filling into the pan and spread it out with a spoon to coat the base layer. Cover with plastic wrap and transfer to the freezer to set, about 30 minutes.
4. Meanwhile, add the spinach, 2 of the kiwis and the spirulina to the remaining cashew cream in the blender and process until the spinach leaves are fully broken down and the mixture is light green, about 30 seconds.
5. Remove the baking pan from the freezer, unwrap it and scoop the kiwi cream atop the cashew cream, using the back of a spoon to smooth the top. Cover the cheesecake again and return it to the freezer until the mixture is set, at least 2 hours.
6. Remove the cheesecake from the freezer and uncover it. Slice the remaining kiwis crosswise into 1/4-inch-thick slices and decorate the top of the cheesecake with the fruit by laying the slices side by side. Cover the cheesecake (with a fresh piece of plastic wrap, if needed) and return it to the freezer to set the kiwi slices, 1 hour.
7. Remove the baking pan from the freezer, uncover it and let the cheesecake defrost to soften slightly, about 10 minutes. Slice the cheesecake into 14 bars and serve.
Note: Kiwi–Passion Fruit Vegan Cheesecake Bars will keep, wrapped well in plastic wrap and then aluminum foil, in the refrigerator for 1 week or in the freezer for 1 month.
Makes about 14 bars
Excerpted from "Unicorn Food: Beautiful Plant-Based Recipes to Nurture Your Inner Magical Beast" by Kat Odell (Workman Publishing). Copyright © 2018. Photographs by AJ Meeker.